Bulk Copy Program (BCP) Utility to Import and Export Data in SQL Server

Bulk Copy Program (BCP) is a powerful command line utility to import and export data in SQL Server database. If you do not have much knowledge about database commands then also you can use it easily. BCP utility is very fast in operation which can save lots of time for processing as compared to other method of bulk import and export of data. We will see how to use this utility and different useful switches involved in it.
First of all open windows command prompt and type bcp and press enter button where you can see different arguments which you can use for copying data to and from SQL Server instance and database. [refer Figure-1]
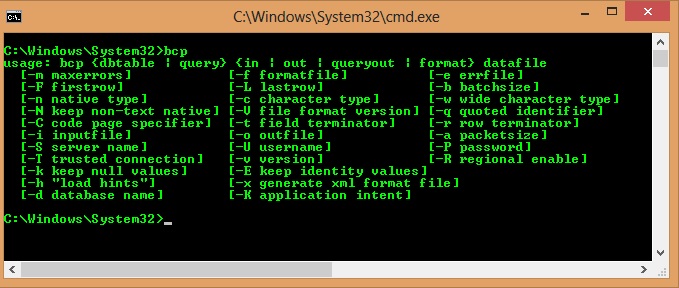
Figure 1: BCP Arguments
C:\Windows\system32>bcp
usage:
bcp {dbtable | query} {in | out | queryout | format} datafile
 [-m maxerrors]            [-f formatfile]          [-e errfile]
 [-F firstrow]             [-L lastrow]             [-b batchsize]
 [-n native type]          [-c character type]      [-w wide character type]
 [-N keep non-text native] [-V file format version] [-q quoted identifier]
 [-C code page specifier]  [-t field terminator]    [-r row terminator]
 [-i inputfile]            [-o outfile]             [-a packetsize]
 [-S server name]          [-U username]            [-P password]
 [-T trusted connection]   [-v version]             [-R regional enable]
 [-k keep null values]     [-E keep identity values] [-h "load hints"]
 [-x generate xml format file] [-d database name]   [-K application intent]
First line shows syntax for BCP.
bcp {dbtable | query} {in | out | queryout | format} datafile
{dbtable | query} – represents database table name to use as a source.
{in | out | queryout | format} – this arguments represents if you want to import data or export data and type of format file.
datafile – represents the full path of data file been used.
Now second part represents different arguments which can be used with bulk copy program (BCP) operations as shown in Figure-1.
Here, to understand it better, we will take few examples.
bcp AdventureWorks2012.dbo.tbl_Person out C:\BCPDemo\tbl_Person.txt -T -c
As shown above, we are copying data from database table to file on disk. AdventureWorks2012 is the name of database, dbo is schema name and tbl_Person is the name of the table which we are exporting to data file on disk. -T is switch used for trusted connections and -c is used for character data format. As you can see we have used out option which is normally used to export data.

Figure 2: Export Data with Trusted Connection
Figure shows 106 rows copied in 1 ms clock time with an average of 106000 rows per second, you can actually imagine how fast this utility is performing operations.
Below is a scenario of mixed mode authentication where you have to specify user name and server name to export data. -Usa is username and -SManzoor is server name, once you click enter, it will prompt you to enter password for user sa, you can also specify the password by switch -P (e.g. -P123456). After successful login it will copy data to the file. [refer Figure-3]
bcp AdventureWorks2012.dbo.tbl_Person out C:\BCPDemo\tbl_Person.txt -c -Usa -SManzoor
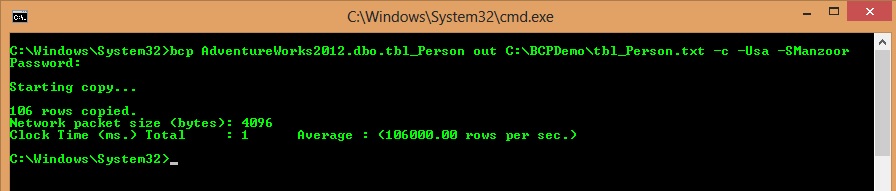
Figure 3: Export Data with Mixed Mode Authentication
If you are passing password along with other switches then it will directly perform the operation without prompting for it as shown below.
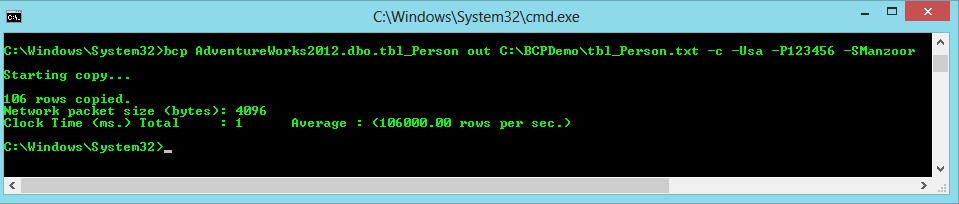
Figure 4: Export Data with Mixed Mode without prompting for Password
bcp AdventureWorks2012.dbo.tbl_Person out C:\BCPDemo\tbl_Person.txt -c -Usa -P123456 -SManzoor
we have passed -P switch with password 123456 which indicates password for login sa.
Now, we will take an example of import data from file location to database server, for that we need to understand structure of data file and create the table with same structure in database where you want to insert records.
Here we will copy data file tbl_Person.txt to a new table which we have created as tbl_PersonInfo with same table structure.
bcp AdventureWorks2012.dbo.tbl_PersonInfo in "C:\BCPDemo\tbl_Person.txt" -T -c
We have used ‘in‘ argument here and successfully imported data into tbl_PersonInfo table, you can select the table from database and verify it with data file. [refer Figure-5]
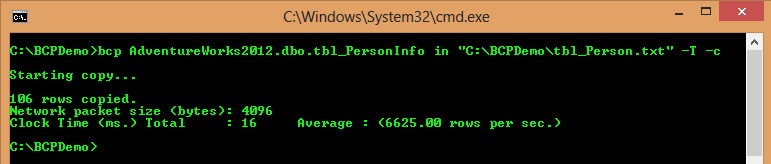
Figure 5: Import Data with Trusted Connection
If you have a requirement to export specific columns then we can do the same with queryout argument. To use queryout argument you need basic knowledge of SQL commands as we have to write query as per requirements. Let’s see an example, we require two columns FirstName and LastName from table tbl_Person for that we will execute below query on windows command prompt.

Figure 6: Export Data with Specific Columns
bcp "SELECT FirstName, LastName FROM AdventureWorks2012.dbo.tbl_Person" queryout C:\BCPDemo\tbl_Person.txt -T -c
Once all rows copied you can cross check data from table tbl_Person of BCPDemo folder on the disk.
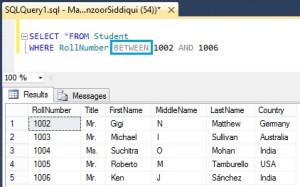
Let’s take one more example where we will copy specific rows from table to a data file. [refer Figure-7]

Figure 7: Export Data with Specific Rows
bcp "SELECT * FROM AdventureWorks2012.dbo.tbl_Person WHERE FirstName='Gigi' AND LastName='Matthew'" queryout C:\BCPDemo\tbl_Person_Rows.txt -T -c
I have given you few examples of bulk copy program with txt file format, you can also use different file format like .dat, .fmt .xml etc by using -f and -x switches.
How to create xml file format, here is a simple line of commands.
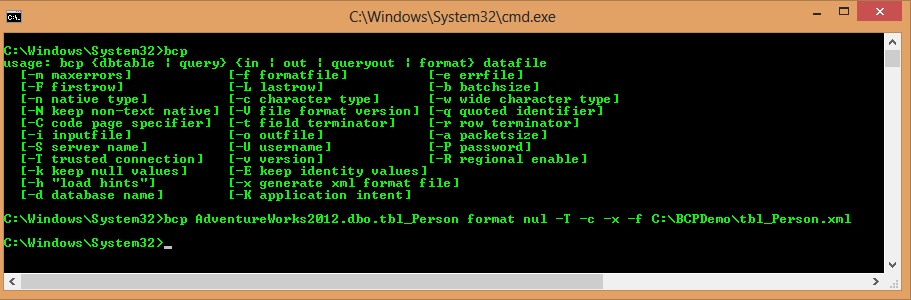
Figure 8: Create XML File Format
bcp AdventureWorks2012.dbo.tbl_Person format nul -T -c -x -f C:\BCPDemo\tbl_Person.xml
You have to specify nul with format which creates format file including -x which indicates general xml format file along with -f.
Let’s open xml file which we have created just now, we will find as below.
<?xml version="1.0"?>
<BCPFORMAT xmlns="http://schemas.microsoft.com/sqlserver/2004/bulkload/format" xmlns:xsi="http://www.w3.org/2001/XMLSchema-instance">
 <RECORD>
 <FIELD ID="1" xsi:type="CharTerm" TERMINATOR="\t" MAX_LENGTH="12"/>
 <FIELD ID="2" xsi:type="CharTerm" TERMINATOR="\t" MAX_LENGTH="16" COLLATION="SQL_Latin1_General_CP1_CI_AS"/>
 <FIELD ID="3" xsi:type="CharTerm" TERMINATOR="\t" MAX_LENGTH="100" COLLATION="SQL_Latin1_General_CP1_CI_AS"/>
 <FIELD ID="4" xsi:type="CharTerm" TERMINATOR="\t" MAX_LENGTH="100" COLLATION="SQL_Latin1_General_CP1_CI_AS"/>
 <FIELD ID="5" xsi:type="CharTerm" TERMINATOR="\t" MAX_LENGTH="100" COLLATION="SQL_Latin1_General_CP1_CI_AS"/>
 <FIELD ID="6" xsi:type="CharTerm" TERMINATOR="\r\n" MAX_LENGTH="100" COLLATION="SQL_Latin1_General_CP1_CI_AS"/>
 </RECORD>
 <ROW>
 <COLUMN SOURCE="1" NAME="BusinessID" xsi:type="SQLINT"/>
 <COLUMN SOURCE="2" NAME="Title" xsi:type="SQLNVARCHAR"/>
 <COLUMN SOURCE="3" NAME="FirstName" xsi:type="SQLNVARCHAR"/>
 <COLUMN SOURCE="4" NAME="MiddleName" xsi:type="SQLNVARCHAR"/>
 <COLUMN SOURCE="5" NAME="LastName" xsi:type="SQLNVARCHAR"/>
 <COLUMN SOURCE="6" NAME="Country" xsi:type="SQLNVARCHAR"/>
 </ROW>
</BCPFORMAT>
CLICK HERE to watch live practical.
Reference: Manzoor Siddiqui [www.SQLServerLog.com]
You may also like